


1. BULLECOURT – Arnold Roy Bartram, KIA 13th May, 1917.
BULLECOURT was the scene of two costly battles for the AIF, the first beginning in the bitterly cold dawn of 11th April, 1917 when, after a night lying in the snow, Australians of the 4th Division were ordered to attack the main German defensive position, the Hindenberg Line. They were supposed to be backed up by British tanks and military, but neither of these eventuated.
Although tanks had been used in the Battle of the Somme six months earlier, they were relatively untested. However the “mastermind” of the First Battle of Bullecourt (General Hubert Gough) was excited when promised 12 tanks to help break down the German wire and clear a path for the infantry. Only four of the tanks made it to their positions – the others had either broken down, got lost or become stuck in the mud. In fact the situation provided sufficient material for a Monty Python comedy sketch. At one point a tank lumbered up to the Australian line, turned, and began firing its machine gun at them. After a chorus of shouts from the Australians a hatch opened in the side of the tank, and the head of a British officer appeared, asking which troops they were, and could they please re-direct him to the German lines! Duly instructed, the tank set off only to be destroyed by a shell minutes later.

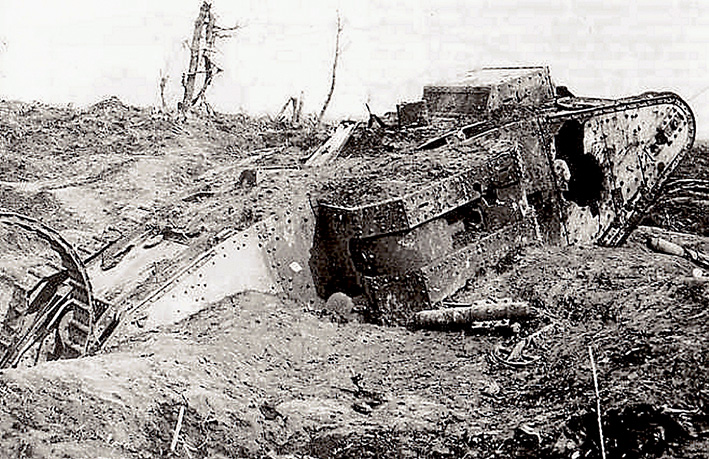
When the Australians did advance, they were cut off by German artillery and machine guns. After ten hours a withdrawal was ordered, and the surviving Australians had to fight their way back to their original positions. The two brigades involved – the 4th and the 12th – had lost 3,300 men between them, including 1,170 men taken prisoner. This was the largest number of Australians captured during a single engagement in the war, and was exceeded only when Singapore fell in 1942. The battle was later used by the British staff as a model of failed planning.
The Second Battle of Bullecourt, from 3rd – 17th May, was somewhat better planned. The 2nd Division was to take the German positions in the village of Bullecourt and they succeeded using 96 Vickers machine guns and the tried and tested artillery creeping barrage; an offer of tank support was pointedly declined! Even with better planning, the attack cost the three Australian Divisions (1st, 2nd and 5th) another 7,000 casualties. And the gain? Less than a mile.
The Germans suffered similar casualties. The second attack proved that the Hindenberg Line was not impregnable, as the Germans had tried to make out. One very important lesson was learned though. Whenever the Germans lost ground they counter–attacked, This resulted in heavy German casualties – men they could ill-afford to lose. Therefore, whenever the Allies took German positions, they planned for a counter–attack and set up machine gun posts accordingly and gave artillery units the required intelligence they needed.
(Footnote: One of those captured on 11th April, 1917 in the First Battle of Bullecourt was Lance/Corporal Reginald Norman Coates (Serial No. 757). A member of 14th Battalion, he was wounded (“metallic fragments in the arm”) and, after a stay in hospital, he saw out the war in Soltau POW camp, being repatriated to England on 26th December, 1918. Reg. Coates was the grandfather of an old school friend – Bill Ford – and I was fortunate enough to be able to chat to him in his later years. Time never diminished his dislike of the tank. –Peter McCullough.)
2. MESSINES RIDGE – Raymond Everard Bartram, KIA 7th June, 1917.
THE Battle of Messines, fought on 7th June, 1917, was the first large–scale operation involving Australian troops in Belgium. The primary objective was the strategically important Wytschaete–Messines Ridge, the high ground south of Ypres. The Germans used this ridge as a salient into the British lines, building their defence along its ten mile length. Messines was an important success for the British army leading up to the Third Battle of Ypres, culminating in the Battle of Passchendaele several months later.

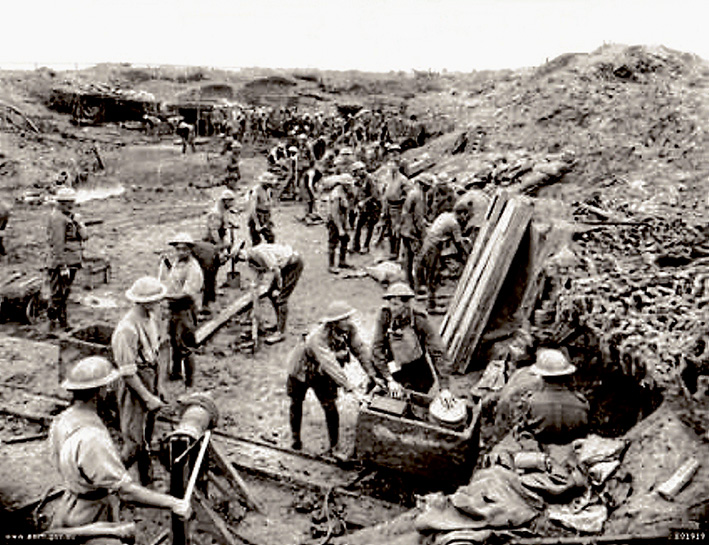
For years Australian, British and Canadian miners had engaged in subterranean warfare digging an intricate tunnel system under the enemy’s front line. These tunnels were packed with massive charges of explosives designed to obliterate enemy defences. More than 1,000,000 pounds of high explosive were packed into underground chambers along a seven mile front. The main Australian effort was at Hill 60 and their work was made famous in a book by Will Davies “Beneath Hill 60” and a feature film of the same name. The Hill 60 mine created a crater 60 feet deep and 260 feet wide.
At 3.10am on 7th June 1917, nineteen powerful mines exploded under the German trenches along the Wytschaete–Messines Ridge. The ground erupted into pillars of fire and earth, instantly obliterating the thousands of German troops above. The German survivors were largely stunned and demoralized due to the great concussion of the blasts, the heavy artillery barrage, and the heavy machine gun fire that now poured upon them. Many German prisoners were taken during this phase
Some 10,000 men were killed in the explosion alone and British troops 400 yards away were blown off their feet. Londoners, including Lloyd George in Downing Street, heard the blast which shook all of southern England. As well as the casualties, the scale of the mine explosions both neutralized the enemy’s guns and disrupted their planned counter–attack.
Heavily supported by great volumes of artillery fire, the British troops surged forward to capture the enemy positions. The 3rd Australian Division under Major-General John Monash, entering battle for the first time, was anxious to prove itself worthy of the reputation of the other divisions. The veteran divisions were dismissive of the 3rd and derided their late entry into the war by calling its men “the neutrals.” The 3rd Division had a point to prove. It made a very successful attack, alongside the NZ Division, just south of the Messines village. The other Australian division involved, the 4th, made a follow-up attack later in the day.
Although some fighting continued, the result was virtually decided by the end of the first evening with the ridge being taken and enemy counter–attacks repulsed. The village of Messines was captured and pill boxes were isolated and destroyed.
It is generally agreed that the Battle of Messines was the most successful local operation of the war, certainly on the Western Front. This success notwithstanding Allied casualties amounted to 13,500 with 6,800 of them being Australians.
Footnote: There were a total of 21 mines which meant that two mines were undetonated on 7th June, 1917. The details of their precise location were mislaid by the British following the war, to the discomfort of local townspeople. A thunderstorm in 1955 detonated one of the mines with the only casualty being a dead cow. The other mine remained undetected until 2004 when the Daily Telegraph carried a report: “50,000 Pound WW1 Bomb Found Under Belgian Farm.”Modern technology had eventually located the last mine. The farmer was unconcerned: “It’s been there all that time, why should it blow up now?”
3. PASSCHENDAELE (THE THIRD BATTLE OF YPRES)-Reginald Percy Bartram.
KIA 4th Oct. 1917
THE Battle of Passchendaele was the final chapter in the saga that was the Third Battle Of Ypres, a monumental effort to drive the Germans from the high ground of the Ypres Salient. Passchendaele was meticulously planned and relied on limited infantry advances supported by creeping artillery barrages that would force the Germans from their strongholds overlooking Ypres. Australian troops had played important roles in earlier advances during Third Ypres, attacking at Menin Road and Polygon Wood in September, and Broodseinde Ridge in early October. As mentioned previously, they had been instrumental in sweeping the Germans from one of their strongest defensive positions at Messines Ridge in June, clearing the way for the Third Battle of Ypres to begin.


On 4th October the Australian 1st, 2nd and 3rd Divisions had advanced up Broodseinde Ridge and captured key German positions on the slopes below the village of Passchendaele. The attack had been a triumph, catching the Germans completely off guard and forcing them to fall back on a wide front. Although the attack cost the Australians more than 6,500 men, it is considered one of their finest victories of the war. Now it was time to tackle Passchendaele itself.
The grim conditions notwithstanding, the Australians never lost their sense of humour. On the morning of 4th October a small group captured a German pill box where they found two crates of carrier pigeons. These were intended to keep German commanders informed of progress in the battle; instead a number of them were used to transport messages from the Australians of an obscene and personal nature, particularly pertaining to the Kaiser. The remaining pigeons were plucked and stewed.
At noon on 4th October the weather changed: rain began to fall which by 8th October had become torrential. The battlefield, pummelled by years of shellfire, became a sea of mud. Unfortunately the British commander-in-chief, Field Marshall Sir Douglas Haig, was not to be deterred. In a war characterized by incompetent decision making, Haig’s call to attack Passchendaele was a standout.
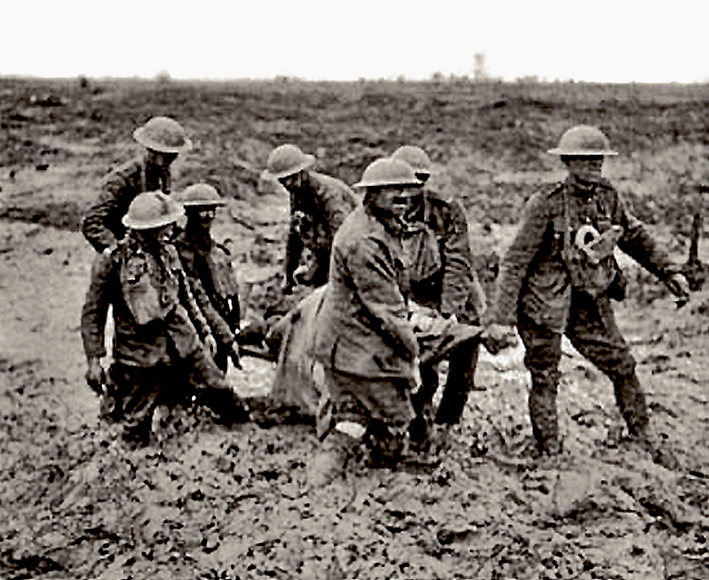
The first advance on 9th October which involved the 2nd Division was not a success and illustrates the great problem of Passchendaele. The previous attacks during the Third Battle of Ypres relied on fresh troops advancing under the cover of accurate artillery fire. At Passchendaele both advantages were absent. The troops were exhausted from the slog through the mud to reach the front line and the artillery became bogged and could not reach its proper positions to support the advance. The quagmire was so deep that field guns needed timber platforms laid on a bed of fascines and road metal. Even then they started to sink after firing a few shells, and soon red flags marked positions where guns had sunk altogether. One soldier told how the march to the front line, which would normally take 1 to 1½ hours, took 11 ½ hours through thigh–deep mud.
The second stage of the advance, the attack on Passchendaele itself, was launched on 12th October and involved the 3rd and 4th Divisions alongside the NZ Division. The troops came under fire from the outset, the limited cover from the weak artillery barrage proving totally ineffective. The advancing troops were struggling in the mud and soon became disoriented and lost touch with the barrage.
The situation was hopeless. The Australians had only taken a few of their objectives and were being decimated by German fire. In the face of mounting casualties the Australians withdrew. The decision to attack had been ludicrous, the attack itself a disaster. The two Australian divisions had lost more than 4,200 men between them. It was estimated that whereas “ground gained” at Messines cost one man per yard, the cost at Passchendaele was 35 men per yard. One stretcher–bearer described the journey to the Regimental Aid Post as a “terrible undertaking: the distance to be covered was less than 1,000 yards but it took six men, four, five, even six hours to do the trip.” Many of the wounded were drowned in the mud and water.

The Australians were relieved by the Canadian Corps, which spent the next two weeks slogging up the same ridge in the same atrocious conditions with Australians supporting their flanks. Eventually the Canadians captured Passchendaele. Even though it was a “victory” in the sense that the village was eventually taken, the British troops were so weakened by the attack that they were left dangerously exposed to a German counter–attack. The Germans exploited this in March, 1918. During their Spring Offensive they swept down the ridge and recaptured Passchendaele.


